A new surface is one of the best ways to add life to your kitchen or bathroom. And here at Integrity Coatings, we’ve made it easier than ever to brighten up your cabinets, countertops, bathtubs, tiles, refrigerators, vent-a-hoods, and even fiberglass fixtures! The refinishing system that we offer can be installed by a refinishing contractor in your area, or you can choose to do it yourself. Here’s what you need to get started:
◈ High-Volume, Low-Pressure Spray Gun
◈ Respirator (To Protect Against Paint Fumes)
◈ Palm Sander
◈ Masking Tape, Paper, & Sandpaper
◈ Integrity Refinishing Coatings: Primer & EP-Acrylic Top Coat
◈ Chemical Cleaners (Step I & Step II)
◈ Caulk, Reducers, Bonding Agents for Porcelain & Tile
The key to a good refinishing job is good preparation. Take the chemical cleaners (Step I and Step II) and apply to every surface to be refinished. The chemical cleaners serve two functions:
1) Cleans and de-greases cabinets, tubs, tiles, appliances, and countertops.
2) Prepares the surface for a chemical bonding agent that will react with the paint to form a tough, long-lasting factory finish for porcelain and tile.
After cleaning, be sure to rinse and dry off all surfaces. After your countertops and cabinets are cleaned, you’ll need to sand them down before painting can begin. Sanding slightly “roughs up” the surfaces and helps the coatings bond better. Use a palm sander for this job. A palm sander vibrates instead of rotates, helping you avoid creating an uneven surface as you prepare the area. Once you’ve sanded all the surfaces, take some paper and masking tape to cover any areas you don’t want painted. If you’re painting around a dishwasher, be sure to mask it off from the inside out. In other words, you want to tape completely around the seals, so they are not painted.
For porcelain or tile surfaces, you will then need to apply the chemical adhesor (bonding agent). Apply approximately 2-3 ounces of this material with a cheesecloth or paper towel or spray it on with a mister. Allow five minutes for this to dry before applying your primers and top coats.
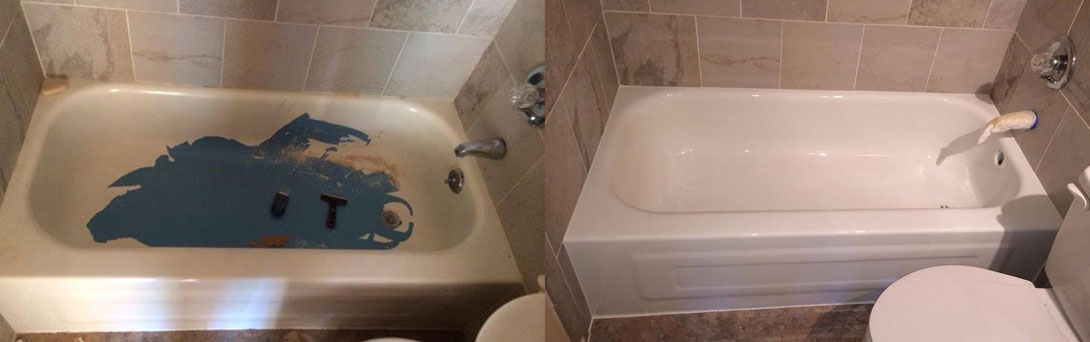
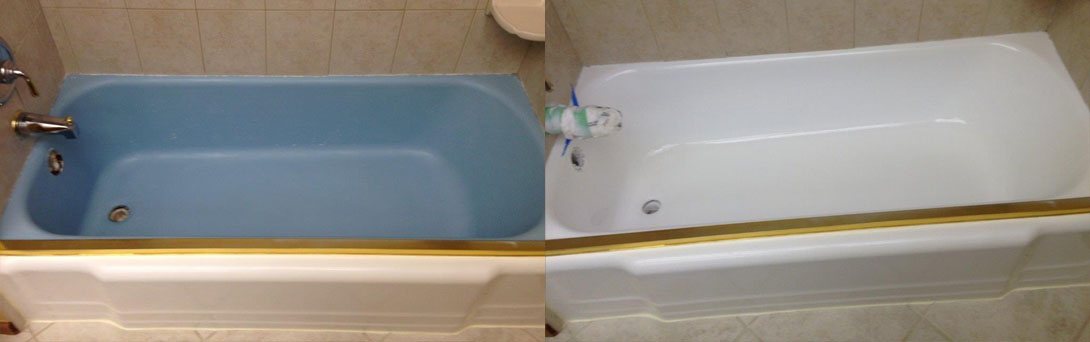
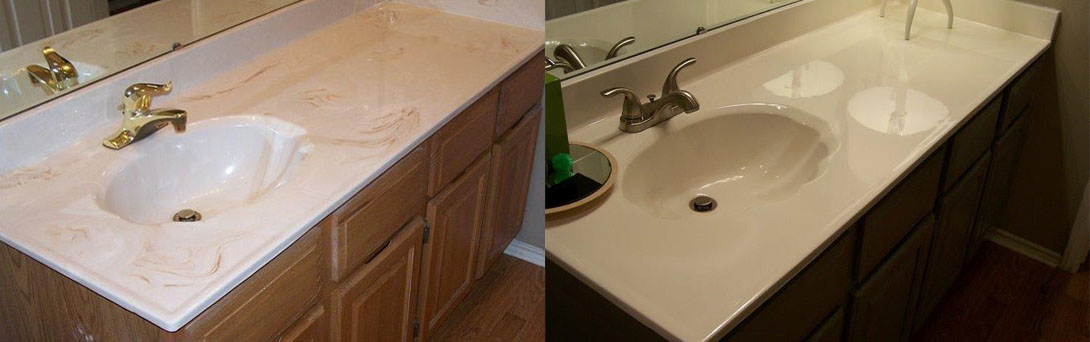
EP-Acrylic is an acrylic polymer coating. The chemical reaction created in this two-component refinishing process produces a beautiful but tough finish that will last for years. It can be used to refinish kitchens, countertops, bathtubs, and even tile. Consumers can choose whatever color they like to create the look they want. The material is available in gloss, semi-gloss, and satin finishes. Gloss is best for tubs, and tile and satin are best for counters and cabinets.
Follow the directions for mixing the primer, pour the mixed primer in the paint pot, and hook up the HVLP spray rig. It’s also a good idea to test the rig on a piece of paper in your garage or yard to make sure that your air pressure and paint flow are correct.
Once you’ve tested the rig, you’re ready to paint. Take the wand of the spray rig and spray back and forth, starting at the top of the surface. When you reach the edge of the surface, release the trigger of the spray gun before you start your next pass. This will greatly reduce the risk of overspray that can cause paint to run. For a smooth application, overlap a quarter of the previous pass with each new pass.
The refinishing system recommends two coats of primer and 2-3 coats of EP-Acrylic top coat. It takes about 30 minutes for each application to dry and then 24 hours for the chemical bonding to finish. The result is a factory finish and a bright new kitchen for relatively little cost. For example, a typical custom replacement in the kitchen (cabinets, countertops, appliances) costs $15,000. By contrast, hiring a contractor will cost you $2,500. If you do the work yourself using our system, it will only cost you $500 or less (including the $35 rental fee for the spray rig).
REFINISH, DON’T REPLACE!
Home | Our Company | Products | Biz Op/Training Class | Partners | Order | Support | FAQs | Contact
© 2021 Integrity Coatings. All rights reserved. Website by web.com.